Almost a week before Microsoft announced Windows 11 in their event. Now we almost have whole experience of new Window’s as Window’s 11 is leaked online. Last time Microsoft had done something new in the UI was way back in 2015 and since then it was the same design and UI till now(2021). But, finally the time has came for the new Windows to launch with new cool and aesthetic design. This update brings a fresh new start menu, centered taskbar, rounded corners, cool animations, new wallpapers, almost every change is present in this leaked Windows 11 21996 build. So if you want to install Windows 11 and test on your laptop or desktop right now, you have come to the right place.Today I will be explaining the step-by-step process to download the Windows 11 ISO image and flash it without any issue. So on that note, let’s go ahead and see how to install Windows 11 on any PC right now.
Download and Install Windows 11 Right Now (June 2021)
Downloading the Leaked Windows 11 ISO Build 21996
Note: Before you go ahead and install Windows 11 on your PC or laptop, I would like to make it clear that this is a leaked Windows 11 build. This image is not officially from Microsoft . It currently does not include all of the rumored new feature, could be filled with bugs, and turn your computer unusable if not installed properly. So, I kindly suggest you proceed with caution, and install this leaked Windows 11 build only if you are curious, tech enthusiast & want to take the risk and try new features.
So, let’s s begin the installation of the new windows 11. Below are the steps for downloading and installing the Window's 11 :
First of all, download the leaked ISO image of Windows 11 right here. I have used this ISO file to install Windows 11. If the link is not working, you can download it from another mirror. Keep in mind that the leaked build is a 64-bit ISO image, so you won’t be able to install Windows 11 on your 32-bit Windows PC as of now.
Step 1:
1.After downloading the iso image file of Windows 11 build, it’s time to flash the ISO image on a USB drive. Make sure you have a USB drive with at least 16GB of storage space.
Step 2:
Now, go ahead and download Rufus (Free). You can check out Rufus alternatives if you need another software to create the bootable installer drive.
-> Next, launch Rufus and click on “SELECT” and choose the Windows 11 ISO image. Make sure the USB thumb drive is selected in the “Device” drop-down menu. After that, keep everything as default and click on the “START” button.
-> Now, go through the initial on-screen instructions and let Rufus flash Windows 11 on the USB drive.
-> Once the process is done, plug the USB drive on the PC where you want to install Windows 11. If you want to install Windows 11 on the same PC, keep the USB stick plugged in. After that, restart your computer
Step 3:
Next, press the boot key continuously while your computer is booting up. It will allow you to select the Boot device. For my HP laptop, it’s the Esc or F9 key. You can look for the boot key for your laptop/ PC from the internet. It should be one of these: F9, Esc, F12, F10, etc.
This is what the startup Menu will look like when you press boot key.
Step 4:
From the Boot device options, select the USB drive on which you just flashed the Windows 11 iso.
Step 5:
Finally, the Windows 11 installer will start. In case you see a prompt asking whether you want to continue the upgrade or clean install Windows 11. Click on “No” to clean install Windows 11.
Step 6:
Now, the setup process is similar to how we install Windows 8 and Windows 10. Choose Install Now -> I don’t have a product key -> Select Windows 11 edition -> Custom.
If you get “The PC can’t run Windows 11” error or a driver-related issue appears, then worry not. Move to the next section to find the solution.
Step 7:
Here, select the partition on which you want to install Windows 11. After that, the Windows 11 installation process will start on your PC.
Step 8:
The setup will take few minutes and after that your PC will restart, and a new Windows 11 setup screen will appear. Go through the on-screen instructions and sign in with your Microsoft account if you want to or else you can also create an offline account if you want.
Step 9:
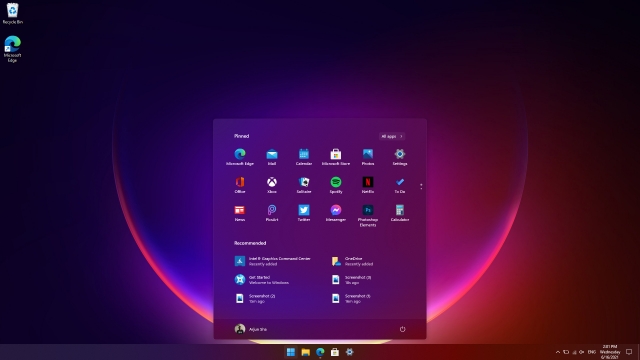
After all the setup process & Settings this is how Windows 11 Home Screen will look like. It’s beautiful!
Fix “The PC Can’t Run Windows 11” Issue
There are two ways to fix “The PC can’t run Windows 11” error and driver-related errors. First off, to boot Windows 11, Microsoft has made it mandatory to support TPM 2.0 and Secure Boot. So basically, you will have to boot into the BIOS/ UEFI and enable both TPM and Secure Boot. And then, the Windows 11 installer should load without any issues.
However, I ditched this method as it can stall the Windows 11 setup. So, I tried an alternative best and tested way.
1. Click on this link and download the latest Windows 10 ISO image from Microsoft’s website. I used the Windows 10 May 2021 build, so I will recommend that.
2. Once you have downloaded the Windows 10 ISO image, right-click on it and select “Mount”.
3. The ISO image will be mounted as a drive. Now, move to the mounted drive and open the “Sources” folder.
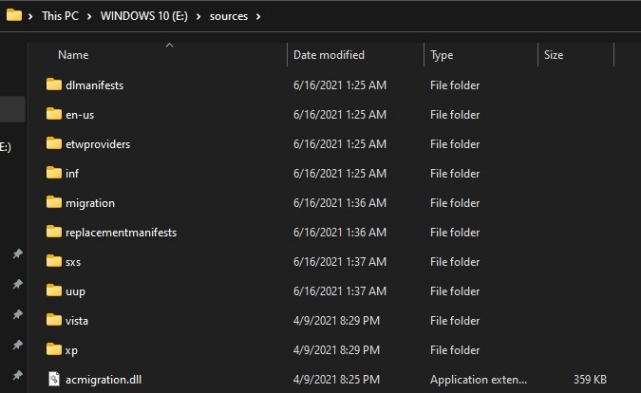
4. Here, select all the files except for “install.wim”. Now, press “Ctrl+C” to copy the files. Repeating again, make sure “install.wim” is not selected when you copy the files.
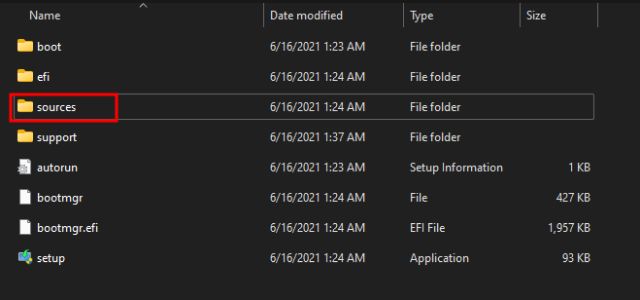
5. Now, plug the USB thumb drive on which you had flashed Windows 11. Open the USB drive and move to the same “Sources” folder.
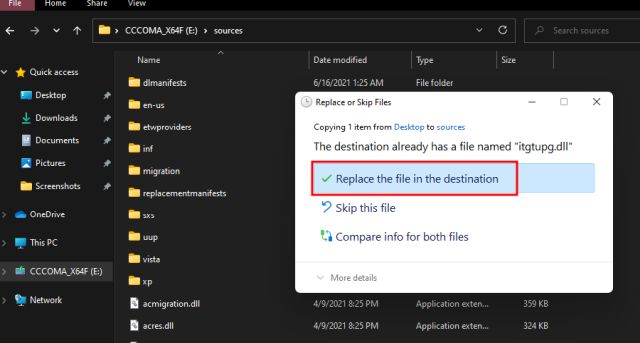
6. Here, paste the files you just copied. Basically, we are replacing Windows 11 files with Windows 10 ones except for the “install.wim” file. When you get a prompt, click on the “Replace the file in the destination” option.
7. Once the files are replaced, you are almost done. Now, just restart your computer and follow the same instructions I have mentioned in the above section. This time you will not face “The PC can’t run Windows 11” or a Driver-related error while installing Windows 11 on your PC.
Enjoy Windows 11 on your device. For any query you on email me on : adahriya1996@gmail.com


0 Comments